How to Turn Your Christmas Tree On/Off with Cloudlinker
Control your smart Christmas tree lights from anywhere using Laravel and Cloudlinker
About this tutorial
In this example, we use a Shelly Plug to control a Christmas tree. Shelly devices have a built-in REST API that we can access through Cloudlinker from your local network.
But let's be honest: it doesn't have to be a Christmas tree! You could use this to control the lighting in your office, turn on the radio for your team, or manage any other connected device in your workplace.
Tip: Any smart device with an API (Shelly, Tasmota, Home Assistant, or your own IoT projects) can be controlled the same way from your web applications using Cloudlinker.
1 Install Laravel
First, create a new Laravel project using Composer:
composer create-project laravel/laravel christmas-tree-app
cd christmas-tree-app
2 Install Cloudlinker Client
Install the Cloudlinker Laravel client package:
composer require stesa/cloudlinker-laravel-clientPublish the configuration file:
php artisan vendor:publish --tag=cloudlinker-config3 Configure Cloudlinker Credentials
Add your Cloudlinker credentials to your .env file:
CLOUDLINKER_ORG_ID=your-organisation-id
CLOUDLINKER_API_KEY=your-api-key
CLOUDLINKER_CLIENT_ID=your-client-uuid
Note: You can find your Organisation ID and API Key in your Cloudlinker dashboard. The Client ID is the UUID of the computer running the Cloudlinker client software.
4 Update Cloudlinker Config
Add the client_id to your config/cloudlinker.php:
<?php

return [
    'organisation_id' => env('CLOUDLINKER_ORG_ID'),
    'api_key' => env('CLOUDLINKER_API_KEY'),
    'base_url' => env('CLOUDLINKER_URL', 'https://cloudlinker.eu/api'),
    'timeout' => env('CLOUDLINKER_TIMEOUT', 30),

    // Add this line for the client ID
    'client_id' => env('CLOUDLINKER_CLIENT_ID'),
];
5 Install Livewire
Install Livewire for reactive UI components:
composer require livewire/livewire6 Create the Livewire Component
Create app/Livewire/ChristmasTree.php:
<?php

namespace App\Livewire;

use Livewire\Attributes\Layout;
use Livewire\Component;
use Stesa\CloudlinkerClient\Facades\Cloudlinker;

#[Layout('components.layouts.app')]
class ChristmasTree extends Component
{
    public bool $isOn = false;
    public ?string $message = null;
    public ?string $error = null;

    public function turnOn(): void
    {
        $this->sendCommand('on');
    }

    public function turnOff(): void
    {
        $this->sendCommand('off');
    }

    private function sendCommand(string $action): void
    {
        $this->message = null;
        $this->error = null;

        try {
            $job = Cloudlinker::jobs()->createAndLaunch([
                'client_id' => config('cloudlinker.client_id'),
                'job_type' => 2, // 2 = HTTP_COMMAND
                'payload' => json_encode([
                    'http_target_url' => "http://192.168.1.28/relay/0?turn={$action}",
                    'http_method' => 'GET',
                ]),
            ]);

            $this->isOn = $action === 'on';
            $this->message = $action === 'on'
                ? 'Christmas tree is now ON!'
                : 'Christmas tree is now OFF!';

        } catch (\Exception $e) {
            $this->error = 'Failed: ' . $e->getMessage();
        }
    }

    public function render()
    {
        return view('livewire.christmas-tree');
    }
}
7 Understanding HTTP_COMMAND Jobs
The HTTP_COMMAND job type allows you to execute HTTP requests from
a Cloudlinker client machine. This is perfect for controlling IoT devices on your local network.
Payload Structure
http_target_url- The URL to call (e.g., Shelly relay endpoint)http_method- HTTP method: GET, POST, PUT, DELETEhttp_headers- Optional: Custom HTTP headershttp_parameters- Optional: Request body parametershttp_authentication- Optional: 'bearer' or 'basic'http_bearer_token- Optional: Bearer token for auth
The request is executed by the Cloudlinker client software running on a computer in your network, allowing you to reach devices that aren't exposed to the internet.
8 Create the Blade View
Create resources/views/livewire/christmas-tree.blade.php:
<div class="min-h-screen flex items-center justify-center py-12 px-4">
    <div class="max-w-md w-full space-y-8">
        <div class="text-center">
            <h1 class="text-3xl font-bold">Christmas Tree Control</h1>
        </div>

        <div class="bg-white rounded-2xl shadow-xl p-6">
            <div class="flex items-center justify-center space-x-2 mb-4">
                <div class="w-3 h-3 rounded-full {{ $isOn ? 'bg-green-500' : 'bg-gray-400' }}"></div>
                <span>{{ $isOn ? 'Lights ON' : 'Lights OFF' }}</span>
            </div>

            @@if($message)
                <div class="bg-green-100 text-green-700 px-4 py-3 rounded-lg mb-4">
                    {{ $message }}
                </div>
            @@endif

            @@if($error)
                <div class="bg-red-100 text-red-700 px-4 py-3 rounded-lg mb-4">
                    {{ $error }}
                </div>
            @@endif

            <div class="grid grid-cols-2 gap-4">
                <button wire:click="turnOn" class="bg-green-600 text-white py-3 rounded-xl">
                    Turn On
                </button>
                <button wire:click="turnOff" class="bg-red-600 text-white py-3 rounded-xl">
                    Turn Off
                </button>
            </div>
        </div>
    </div>
</div>
9 Add Routes
Add the route to your routes/web.php:
use App\Livewire\ChristmasTree;

Route::get('/christmas-tree', ChristmasTree::class);
10 Run the Application
Start the development server:
composer dev
Visit http://localhost:8000/christmas-tree
to control your Christmas tree!
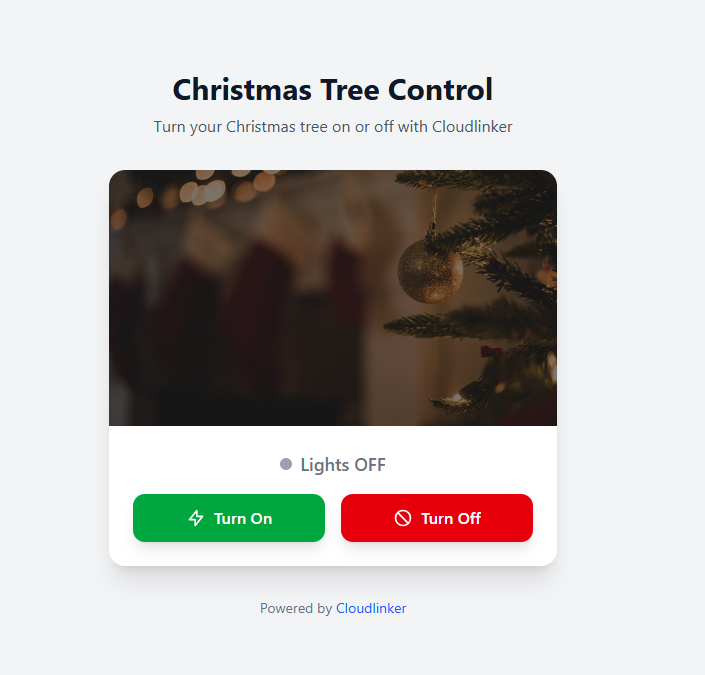
Screenshot
Here's what the finished application looks like:
Ready to Get Started?
Sign up for a free Cloudlinker account and start controlling your devices today.
Create Free Account